Saturday, October 1, 2016


                                                        A few more...

Friday, September 30, 2016

Quick and Easy
 It has been too long. That shouldn't happen again any time soon...We had a whole lot of crazy going on. It hasn't ended, but I am at least able to play catch up now.
 Through the last 6 weeks or so I have had little time for creativity, and I am missing it! Here is a quick and easy project to get me started again...

 This project is great for when you only have a few minutes and you need a little color in your life.

I went to Michael's Arts and Crafts store. They had these packs of THANK YOU cards for $1.50. I don't usually buy ready made cards, but the paper looks like it could take watercolor so I thought I might try to embellish some.
I also found this set of fun CIRCLES and DOTS by Inkadinkado...on clearance! Love these!
I chose a rainbow of bright colored inks from my stash...
I cut a mask to cover the foiled words, and stamped to my heart's content!
Removed the mask, and VOILA! A brightened up Thank you card!

 Below are more examples...


A Wendi Vecchi background...
Some distress inks and water,
A double thickness of masking,
I put the card on the background. Where there were empty spots I tapped it on the background again until it was covered. I dabbed off the excess ink...
Removed the mask and here it is. Here is another one...

The possibilities are endless, so go have some fun with color!


Friday, September 9, 2016

Dear Readers,
 I have not abandoned this blog. Life is beyond full at the moment, so I have no time to be creative. I will be back as soon as I can!
 Until then, enjoy the color!
 ~Amye.

Thursday, August 25, 2016

Many Thanks

Many Thanks!

 Sometimes you just need to say thank you! There are so any ways to say it, and with this idea you don't have to choose!

 This set of clear stamps from Inkadinkado called "Thanks" has so many ways to express gratitude!

 My first step was to cut panels for the front of my cards. My card bases are 4" x 5-1/2" and I wanted to frame the center panel, so I cut them 3-1/2" x 5". I prefer to have 1/4" between layers on my cards.

 
 With the MISTI open, I placed the paper where I wanted to set up the stamps. I chose the stamps for the card and arranged them on the card panel. Once the MISTI closed on the stamps, they clung to it and it was set up to make as many cards as I wanted.


A little black Archival ink by Ranger, and a firm pressing down, and there it is.


                                                  Next I used This Hero Arts Ombre pad.


I oriented the ink pad  with the blue side out, and the pink side in the middle. I wiggled it over the stamps on one side, then turned it around and did the same on the other side.


 This time I had to re-ink the stamps several times and press down before the words looked right. I love that you can do that with the MISTI. These cards can be made using an acrylic block, but if you have trouble with the ink like I did, it really helps to be able to repeat your stamping in exactly the same place.


      I decided to fill in some spots on the card front with some random little stamps I had. I think they were part of a $1 set I'd picked up at Michael's craft store. (I did the same with different stamps on the colored front.)


I used black and white washi tape to edge the card for a simple finished look.


 It may be difficult to see in the picture, but I edged the panel with the black ink by just running the paper over the ink pad. I cut foam and made a sandwich between the card base and the panel.


To complete it I added faux pearls and a little Wink of Stella. The fun part is I can turn this card and use it in either the portrait or landscape orientation depending on my mood when I use it!


 For the colorful Thank You card, I chose some colored paper from the Color Splash collection by Recollections. Michael's was selling it at 70% off and that was when it came home with me.

I added some bling by adding little rhinestones to the middle of the sequins. I fount these colorful little ones meant for manicures at Five Below (which is a "Dollar" store where, yup you guessed, everything is $5 or below). I always have my eye open for card making supplies, and sometimes it is cheaper to buy things outside the craft store.


 This time I did not raise the panel, but taped it all flat.
 This card will do, but I don't think the paper and ink like each other. The ink pad is new to me, so I'll just keep trying it out with different papers to see what works best.

   I hope you are inspired to put some stamps together to make a card. Have fun, and THANK YOU for visiting!


Wednesday, August 17, 2016

Stepping Stones Background Stamp from Simon Says Stamp

Hello!
 Today I made two different cards with the same background stamp.


  I have a new stamp I had yet to use from SimonSaysStamp.com called "Stepping Stones."


 I am also using a Stampin' Up paper that I recently discovered, and I am in love with. The paper is called "Shimmery White." It is a little thicker than the usual card stock, and has a shimmer to it, you can't have too much shimmer! The best part? It takes watercolor well, yet it is smooth! I love this stuff!


  DISCLAIMER: I am a reformed "Stampin' Up Snob." For a time I didn't look outside their catalogs, except for a few trips to Michaels. I am a demonstrator for Stampin' Up, but I have never done a big business for them. I am not allowed to link Stampin' Up products here if I use competing brands, so there will not be any links to their products. Feel free to contact me if you would like to purchase from them, and I will be glad to help you out.

                                            Let's make the cards!


 First I cut my paper to 4" X 5-1/2" pieces which fit the front of the Recollections card/envelope sets I purchased at Michael's (craft store).


I inked up my stamp with my Versemark Stamp pad, stamped the card fronts.


Then I embossed with clear embossing powder.I forgot to rub with the anti-static tool on the first card front but brushed off the excess powder with a paintbrush.

This is why I just can't be exclusive...I have grown to love the many ways Tim Holtz Distress Inks can be used.


 After rubbing the mini stamp pad on an acrylic block,


I used my water-filled watercolor brush to pick up the color.


Then watercolor!
 Once these dried, I decided I wanted to get rid of the shiny embossing, for a more organic look.


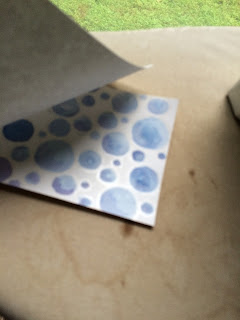
I took a piece of scrap paper and placed it over the top of the card front, then ironed off the embossing until it was gone. The scrap paper lifts most of the embossing off. You can continue to iron with clean paper until you get the effect you want.


 You can still see a little shine, and the Versamark ink is quite visible on the blue and white card front.


 I finished off the first card with a sweet quote from the "Friendly Advice" stamp set from Inkadinkado, embossed in white on vellum paper.


 I used the fine tip glue pen from Stampin' Up to put a tiny bit of glue behind the white words and the rhinestones on the top, to adhere the banner onto the card.


For the second card I stamped an image from Cherished Teddies and colored it using a blender pen and the same Tim Holtz Distress Inks. I also reverted back to using the watercolor brush as well.


Once the image was fully colored, I fussy cut it out, put double stick tape on the back, and adhered it to an oval of velum that I cut out using a Spellbinders Nestabilities die.

 I felt the oval needed a little definition so I used my white Dylusions paint pen around the edge.


 I put some Stampin' Dimensionals (which are foam dots, but hexagon in shape and not too thick) on the back of the velum where they would be covered by the image.

 I hope you enjoyed these cards. If you haven't tried this technique, I encourage you to try it. I love the way the water coloring looks once the embossing is gone.

 Have a blessed day, and enjoy some color!

Below are links to some of the products I used, and others are similar products.
The distress ink sets can also be purchased separately.