Hello!
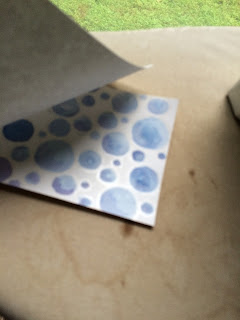
Today I made two different cards with the same background stamp.
I have a new stamp I had yet to use from SimonSaysStamp.com called "Stepping Stones."
I am also using a Stampin' Up paper that I recently discovered, and I am in love with. The paper is called "Shimmery White." It is a little thicker than the usual card stock, and has a shimmer to it, you can't have too much shimmer! The best part? It takes watercolor well, yet it is smooth! I love this stuff!
Let's make the cards!
First I cut my paper to 4" X 5-1/2" pieces which fit the front of the Recollections card/envelope sets I purchased at Michael's (craft store).
I inked up my stamp with my Versemark Stamp pad, stamped the card fronts.
Then I embossed with clear embossing powder.I forgot to rub with the anti-static tool on the first card front but brushed off the excess powder with a paintbrush.
This is why I just can't be exclusive...I have grown to love the many ways Tim Holtz Distress Inks can be used.

After rubbing the mini stamp pad on an acrylic block,
I used my water-filled watercolor brush to pick up the color.
Then watercolor!

I took a piece of scrap paper and placed it over the top of the card front, then ironed off the embossing until it was gone. The scrap paper lifts most of the embossing off. You can continue to iron with clean paper until you get the effect you want.
You can still see a little shine, and the Versamark ink is quite visible on the blue and white card front.
I finished off the first card with a sweet quote from the "Friendly Advice" stamp set from Inkadinkado, embossed in white on vellum paper.
I used the fine tip glue pen from Stampin' Up to put a tiny bit of glue behind the white words and the rhinestones on the top, to adhere the banner onto the card.
For the second card I stamped an image from Cherished Teddies and colored it using a blender pen and the same Tim Holtz Distress Inks. I also reverted back to using the watercolor brush as well.
Once the image was fully colored, I fussy cut it out, put double stick tape on the back, and adhered it to an oval of velum that I cut out using a Spellbinders Nestabilities die.
I felt the oval needed a little definition so I used my white Dylusions paint pen around the edge.
I put some Stampin' Dimensionals (which are foam dots, but hexagon in shape and not too thick) on the back of the velum where they would be covered by the image.
I hope you enjoyed these cards. If you haven't tried this technique, I encourage you to try it. I love the way the water coloring looks once the embossing is gone.
Have a blessed day, and enjoy some color!
Below are links to some of the products I used, and others are similar products.
The distress ink sets can also be purchased separately.


No comments:
Post a Comment